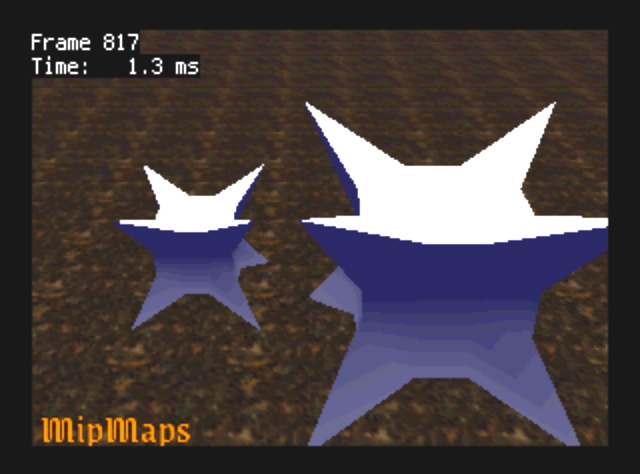
Nintendo 64 Part 20: TMEM Format and Mip Maps
I like how my model format works. I just load one chunk of data from the cartridge to RAM, and then execute it as a display list. Can I do something similar with textures? Yes, although it turns out that I need to learn how textures are stored in memory first.
How Loading Textures Works
The API for loading textures is straightforward.
The texture loading commands do take a lot of arguments, but they’re
simple when you look closely.
The simplest texture loading command is gDPLoadTextureBlock,
which is a macro, but if it were a function its type signature mightbe
like this:
gDPLoadTextureBlock(Gfx *gdl, u32 timg, u32 fmt, u32 siz, u32 width,
                    u32 height, u32 pal, u32 cms, u32 cmt,
                    u32 masks, u32 maskt, u32 shifts, u32 shiftt);
The pal argument is irrelevant because I’m not using color
index textures.
The S and T coordinates (the names for X, Y in texture space) are controlled
the last six arguments, which for a simple 32x32 texture, will just be
(0, 0, 5, 5, 0, 0).
Although the macro has a straightforward interface, it is actually implemented as seven GBI commands. It does the following steps (not counting sync commands):
- Sets the location in RAM and format of the image to load with
gDPSetTextureImage. - Sets tile descriptor 7 to contain the location in TMEM where
the texture should be loaded, with
gDPSetTile. - Loads texture data from RAM into TMEM with
gDPLoadBlock. - Sets tile descriptor 0 to point to the texture in TMEM with
gDPSetTile. - Sets the texture size with
gDPSetTileSize.
If I want to load a mipmapped texture straight from cartridge, I’d like
to load everything into TMEM with a single gDPLoadBlock
command, and then issue several commands to set up the mipmap levels.
This means I could issue a single dynamic call to
gDPSetTextureImage and then put the rest of the setup
in a display list.
The display list must assume a fixed size and format, but this is
reasonable—given the texture limitations, there probably won’t be many
different sizes of mipmapped textures, and at first I’ll only add support
for 32x32 textures with 16-bit RGBA.
However, it turns out that I have to rearrange the pixels in my asset format in order to make this work. The reasons become apparent once you understand how TMEM is organized, and the reasons why it is organized that way.
Inside Texture Memory
Texture memory is 4096 bytes, but it’s not organized as flat memory. It’s grouped hierarchically into eight banks of 512 bytes each. Each bank is 256×16 bits.
You can see eight blocks lined up in a row on the RCP die photos.
Consider this: the RDP can, in one cycle, load three texels from a 2x2 block for blending. How can this work? The texels must be loaded from different banks, which means that the the texels above and below must not be stored in the same bank.
If you just store a 16-bit image in linear order, and spread the image across eight banks, then each column of pixels in the texture will be stored in a single bank. To fetch a 2x2 block of pixels, the same bank would have to be accessed twice, which can’t be done in a single cycle.
This is explained in §13.8.1 “Memory Organization” in the manual. The RDP solves this problem for 4-bit, 8-bit, and 16-bit textures by reordering the pixels in odd-numbered rows. For every eight-byte block of texture data in an odd-numbered row, the first four bytes are swapped with the last four bytes. So, a 16-bit texture which is 8 pixels wide will have the pixels stored in the following order:
| 0 | 1 | 2 | 3 | 4 | 5 | 6 | 7 |
| 10 | 11 | 8 | 9 | 14 | 15 | 12 | 13 |
| … |
This means that any 2x2 block of texels will use exactly four different banks in TMEM.
32-bit textures are similar, except since each texel takes two banks, the texture is split across the low four banks and the high four banks—which means that 32-bit textures are not stored contiguously in TMEM!
Creating and Loading Mipmapped Assets
Creating the mipmapped assets is easy. First, pad all rows of the texture to 8-byte boundaries, to match the the padding requirements in TMEM. Then, for odd-numbered rows, swap each pair of 4-byte blocks. All the mipmap levels are then laid out contiguously. Here is the layout for a 32×32, 16-bit texture. Note the padding for levels 4 and 5.
| Level | Dimensions | Byte Offset | Byte Size |
|---|---|---|---|
| 0 | 32×32 | 0 | 2048 |
| 1 | 16×16 | 2048 | 512 |
| 2 | 8×8 | 2560 | 128 |
| 3 | 4×4 | 2688 | 32 |
| 4 | 2×2 | 2720 | 16 |
| 5 | 1×1 | 2736 | 8 |
| Total | 2744 |
Here is the display list for loading the texture into TMEM.
Note that the LoadBlock command takes the index of the
last texel as an argument, and the TMEM addresses have eight bytes—
so the second tile, which starts at byte 2048 in the asset, has TMEM
address 256.
static Gfx texture_dl[] = {
    gsSPTexture(0x8000, 0x8000, 5, 0, G_ON),
    gsDPSetTextureLOD(G_TL_LOD),
    gsDPSetTextureFilter(G_TF_BILERP),

    // Load data into TMEM.
    gsDPSetTextureImage(G_IM_FMT_RGBA, G_IM_SIZ_16b, 1, texture),
    gsDPSetTile(G_IM_FMT_RGBA, G_IM_SIZ_16b, 0, 0, G_TX_LOADTILE, 0,
                G_TX_NOMIRROR, 0, G_TX_NOLOD, G_TX_NOMIRROR, 0,
                G_TX_NOLOD),
    gsDPLoadSync(),
    gsDPLoadBlock(G_TX_LOADTILE, 0, 0, 1371, 0),

    // Set up 6 mipmap levels.
    gsDPPipeSync(),
    gsDPSetTile(G_IM_FMT_RGBA, G_IM_SIZ_16b, 8, 0, 0, 0, 0, 5, 0, 0,
                5, 0),
    gsDPSetTileSize(0, 0, 0, 31 << G_TEXTURE_IMAGE_FRAC,
                    31 << G_TEXTURE_IMAGE_FRAC),
    gsDPSetTile(G_IM_FMT_RGBA, G_IM_SIZ_16b, 4, 256, 1, 0, 0, 4, 1,
                0, 4, 1),
    gsDPSetTileSize(1, 0, 0, 15 << G_TEXTURE_IMAGE_FRAC,
                    15 << G_TEXTURE_IMAGE_FRAC),
    gsDPSetTile(G_IM_FMT_RGBA, G_IM_SIZ_16b, 2, 320, 2, 0, 0, 3, 2,
                0, 3, 2),
    gsDPSetTileSize(2, 0, 0, 7 << G_TEXTURE_IMAGE_FRAC,
                    7 << G_TEXTURE_IMAGE_FRAC),
    gsDPSetTile(G_IM_FMT_RGBA, G_IM_SIZ_16b, 1, 336, 3, 0, 0, 2, 3,
                0, 2, 3),
    gsDPSetTileSize(3, 0, 0, 3 << G_TEXTURE_IMAGE_FRAC,
                    3 << G_TEXTURE_IMAGE_FRAC),
    gsDPSetTile(G_IM_FMT_RGBA, G_IM_SIZ_16b, 1, 340, 4, 0, 0, 1, 4,
                0, 1, 4),
    gsDPSetTileSize(4, 0, 0, 1 << G_TEXTURE_IMAGE_FRAC,
                    1 << G_TEXTURE_IMAGE_FRAC),
    gsDPSetTile(G_IM_FMT_RGBA, G_IM_SIZ_16b, 1, 342, 5, 0, 0, 0, 5,
                0, 0, 5),
    gsDPSetTileSize(5, 0, 0, 0 << G_TEXTURE_IMAGE_FRAC,
                    0 << G_TEXTURE_IMAGE_FRAC),

    gsSPEndDisplayList(),
};
There is some additional state to set for mipmapping. The RDP must be put in two-cycle mode and the appropriate rendering and color combining modes must be set.
In two-cycle mode, two textures are available to the color combiner
during the first cycle.
The G_CC_TRILERP mode will blend between the chosen
mipmap levels correctly.
gsDPSetCycleType(G_CYC_2CYCLE),
gsDPSetRenderMode(G_RM_PASS, G_RM_ZB_OPA_SURF2),
gsDPSetCombineMode(G_CC_TRILERP, G_CC_DECALRGB2),
And it works! The texture gets less sharp towards the top of the screen, where it’s farther away.